How to Tighten Chain on a Honda CRF 150?
BraapAcademy.com earns a small commission from qualifying purchases.
This does NOT cost you extra.
Contents
Tightening the chain on CRF 150 dirt bike might not be the first thing you think of when heading out to the garage to load up your bike and head to the trails. However, we all know it’s important to check and tighten chain on CRF 150 bikes regularly.
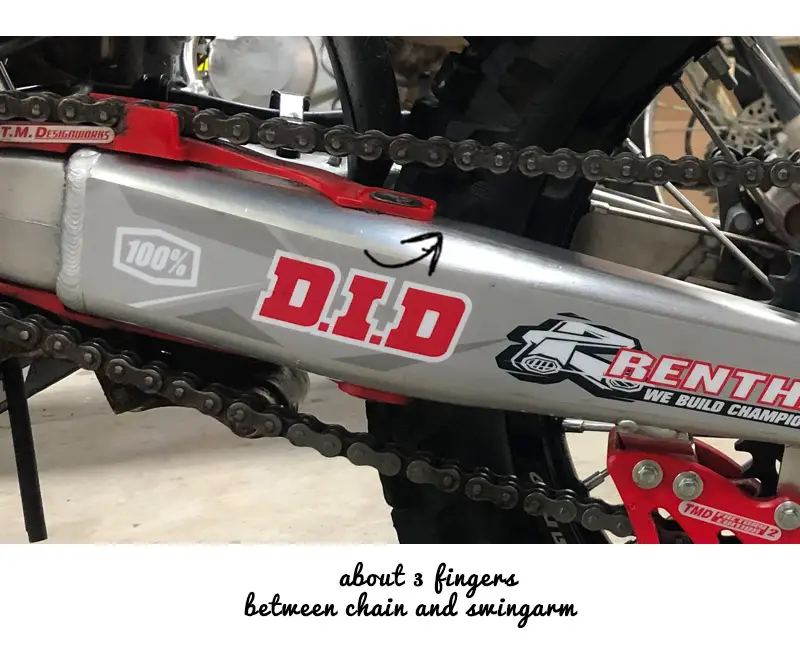
The Honda CRF 150 chain should be inspected and lubricated after every 2 1/2 hours. To maintain the correct chain-tension on a CRF 150, you need to ensure that the slack is three fingers between the chain guard and the swingarm, as pictured in step #4.
If the chain becomes loose it will most-likely damage and wear down your sprocket… plus it could snap and put a hole in th engine case.
Tools You’ll Needed for the Job
Here is a list of tools for the job. You’ll notice that a few are optional.
- Exhaust Plug
- Dirt bike engine degreaser
- Grunge Brush (for cleaning chain)
- Dirt Bike Stand (here are a few I like)
- Large Crescent Wrench
- Small-Medium Crescent Wrench
- Dirt Bike Chain Lube
Clean the Chain Before Adjusting
There are a few steps to follow to tighten your dirt bike chain correctly – the process is pretty straightforward.
The very first thing to do is wash your CRF 150 dirt bike and chain. Being caked with dirt, oil, and other unwanted materials isn’t going to help anyone and it can make it a messy job. Having a clean bike chain (and bike) will help it to last longer and work better.
Steps to Tighten a CRF 150 Chain
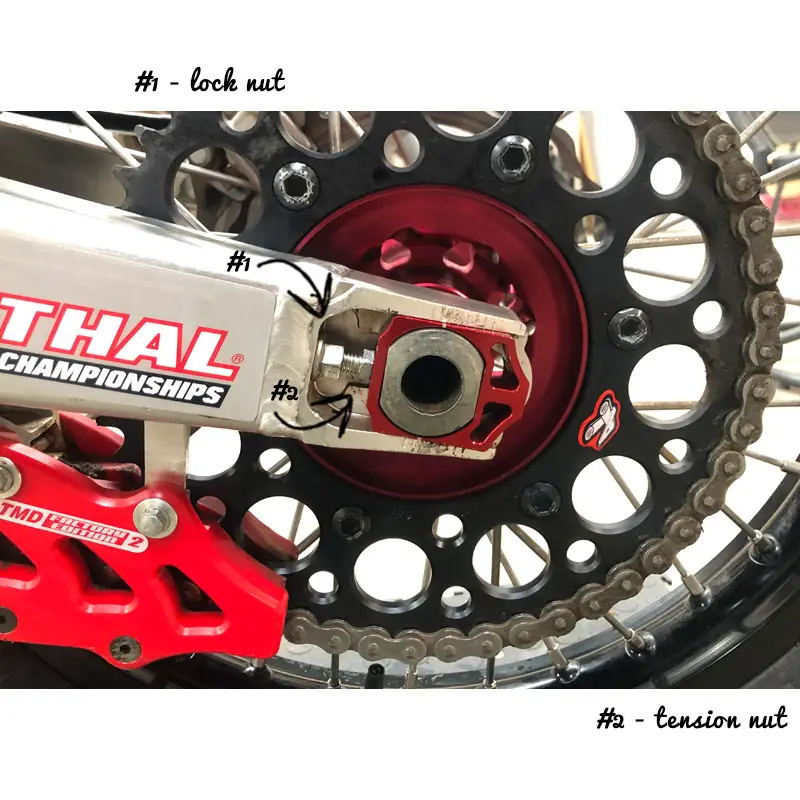
Step #1 – With the large crescent wrench, loosen the nut on the CRF 150’s axle; it can be located on either the left or the right side depending on the bike. You will need to loosen it so that it turns with no tension.
Step #2 – Take the 12MM (or whatever size you need) wrench and loosen the lock nuts, which are against the swingarm. Loosen both sides.
Step #3 – With a wrench, turn the tension bolt out until the CRF 150 chain feels correct (details in step #4). You will need to do the left side first because you are adjusting the chain. If you were to adjust the right side first, you would then have to make multiple adjustments later on.
Step #4 – Measure chain slack. The correct chain slack for a Honda CRF 150 is 1 – 1.25 inches at the end of the chain guide. An accurate way to see if it is correct is to put 3 fingers between the chain and the swingarm, right at the end of the chain guide. The chain and swingarm should be pressing on your fingers. If this is the case the chain has been tightened properly.
Step # 5 – Repeat for right side. Once the CRF 150 chain has been tightened enough on the left side, you will then need to do the same on the right. There will be marks located on the axle blocks, and on the swingarm, you will need to adjust the right side so the notch is in the same position as it is on the left. If it isn’t, it will result in the wheel not spinning straight and could damage the bike or even result in an unwanted crash.
Step #6 – Make sure everything is tightened down – lock nuts & axle nut.
Step #7 – And that is all it takes to adjust the tension and tightness of a Honda CRF 150 dirt bike chain. However, it’s best practice to lube it up afterwards. Keeping the chain greased is important. If you didn’t clean and lube the chain already, then just grab a good chain lube (like this one) and apply as described in the instructions.
Ok, now you’re done!
Correct CRF 150 Chain Maintenance
As outlined in a our maintenance schedule for dirt bikes, you need to make sure that you are checking the CRF 150 chain over and cleaning it regularly. Also, this will ensure that no debris is in the chain, as this could cause an accident or harm the bike.
If you look after your CRF 150 chain, it will result in the chain having a longer working life, and will also save you money as you won’t need to replace it, or other parts, as often or pay for any damages.
Step-by-Step Video


